Showing posts with label kismet. Show all posts

Tuesday, October 9, 2012

Cookbook: actionscript -> kismet commands with parameters

At some point in your project, you'd like to create some nice menu and be able to load different levels, setup resolutions, etc. Let me show you the way how to simply do it and additionally use utilize parameters as well.
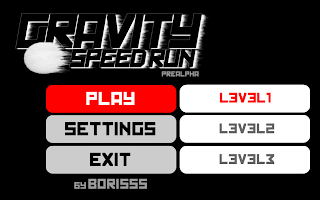


For my demo installer I needed some simple menu (possibility to choose from a set of levels and change resolution for older HW/notebooks). I didn't have much time to play with Scaleform and so I've chosen actionscript 2.0 approach that was more familiar to me. Easiest way to send a string command to unreal is by using fscommand.


   1:  buttonLevel[i].onPress = function() {
   2:              //command to be linked with kismet node
   3:                         //actual command we want to run in kismet
   4:     fscommand("loadmap","open " + levelNames[this.id]);
   5:  };


This method can additionally have a string of parameters that can be parsed/used in kismet to avoid necessity to creating separate kismet nodes for generic tasks (e.g. open level1, open level2, ... open level37). If you're curious how to react on such a command on unreal side, utilize kismet event node FsCommand (New Event/Gfx UI/FsCommand). This node has an optional argument that can be sent to any other kismet action (e.g. Console Command for opening levels).


FsCommand node requires its parameter fsCommand to be set to string that links it with actual fscommand sent from action script.

So in our case for example for opening levels we send fscommand from scaleform with argument (easier to compose it in actionscript than in kismet) that is the actual command to run in kismet and in kismet we just link this string argument and use it in another kismet action. Nevertheless we are sufficient with simple kismet node setup without the necessity to create a separate scheme (and devise separate command names) for each new level to load/resolution to set, etc.

Monday, October 8, 2012

Cookbook: Prefabs

Ever wondering how to compose some complex set of meshes with animations, sound effects, particles into one object with ability of easy instancing? Well, in this case Prefabs are just what you are looking for!

You can create them easily in UnrealEd and reuse wherever you need them without the need to painfully copy kismet schemes, setting all the different parameters, etc. And of course you can decompose your prefab, change a few things and create another version for later reuse.

Let's say we want to have doors that are opened by a button/lever (that requires at least button actor, door interpactor, matinee for doors and kismet assemble). Quite a lot to handle repeatedly if you can just instance one composed prefab instead ;). Here is an example how to create given prefab in editor:


  • insert individual meshes/archetypes for both button and door


  • prepare kismet setup and simple matinee with movement track for door InterpActor


  • with all individual parts set and selected, right click and choose Create Prefab... option. Choose package name, etc. and select Yes for prompt to found kismet sequence (to make it part of prefab) and replacing individual actors in scene with prefab. From now on you can insert another instances of this prefab setup from your Content Browser (and of course position/rotate them differently to work appropriately in your level).


  • in case you need to change some parts of prefab, select its instance and right click, Convert PrefabInstance To Normal Actors, update, create different version of prefab, etc.


Wednesday, October 3, 2012

Cookbook: UDK timers

Timers in UDK are very useful if you want to call a postponed method (e.g. in 5seconds) or call something regularly (e.g. doing some statistics update each 10 seconds).

Syntax is very simple:


   1:  //set timer: (time to trigger,
   2:  //            true - repeated/false - once only,
   3:  //            method name to call in '')
   4:  SetTimer(2.0,,'MyTimerName');
   5:   
   6:  //stops timer execution
   7:  ClearTimer('MyTimerName');

Let's take a look at a simple example. Let's say we want to have a button that resets itself after given amount of time and additionally updates HUD with time left regularly (for HUD messaging see previous tutorial Cookbook: UDK cascading HUD messages, for kismet events see previous tutorial Cookbook: Triggering events, uscript -> kismet ).


   1:  class ButtonActorTimer extends ButtonActor;
   2:   
   3:  /** time for button to stay activated (then reset) */
   4:  var(Game) float fTimeToReset;
   5:   
   6:  /** time for tick (display message) */
   7:  var(Game) float fTimeToTick;
   8:   
   9:  var float fTimeLeft;
  10:   
  11:  //========================================================================
  12:  function TimeOut()
  13:  {
  14:      //trigger event with myself as instigator
  15:      self.TriggerEventClass(class'SeqEvent_ButtonReset', self);
  16:      Reset();
  17:  }
  18:   
  19:  //========================================================================
  20:  function TimeTick()
  21:  {
  22:      fTimeLeft -= fTimeToTick; //update time
  23:      Controller.StringToHUD(fTimeLeft$"..."); //show HUD message
  24:  }
  25:   
  26:  //========================================================================
  27:  function Set()
  28:  {
  29:      SetTimer(fTimeToReset,,'TimeOut'); //set new reset timer (called once)
  30:      fTimeLeft = fTimeToReset;
  31:      SetTimer(fTimeToTick,true,'TimeTick'); //ticking message (repeatedly)
  32:  }
  33:   
  34:  //========================================================================
  35:  function Reset()
  36:  {
  37:      ClearTimer('TimeOut'); //reset timer!
  38:      ClearTimer('TimeTick');
  39:  }

Button has two independent timers, one for reset (re-enable button, and send reset event to kismet) after time is up (door closes, etc.), second timer is for HUD update and sends time left message onto HUD.

Here is some ingame screenshot:


Monday, October 1, 2012

Cookbook: Triggering events, uscript -> kismet

Imagine you want to have a custom unrealscript actor (e.g. button). Obviously you want that button to introduce some interactivity to your scene/level. Let's say you want it to trigger some event for kismet (universal event that you want to be able to hook to any action available - play a matinee movie, toggle light, etc.)

What do we need?

1. create simple Seq_Event

All we need is a super simple event without any internal functionality. It's a good habit to organize it into some category (ObjCategory).


   1:  class SeqEvent_ButtonSet extends SequenceEvent;
   2:   
   3:  defaultproperties
   4:  {
   5:      ObjName="ButtonSet"       //kismet event name
   6:      ObjCategory="MyGame" //kismet event menu category
   7:      bPlayerOnly = false       //only pawn based actor can trigger?
   8:  }


2. trigger it from script

In our ButtonActor we need to trigger the given event somewhere. In this example it is triggered whenever touch event occurs (it'd be better to have some checks whether it's triggered by our pawn, some specific actor, etc.). To make our life easier, event is added to SupportedEvents in defaultproperties (this way it'll show in kismet right click menu when buttonActor is selected in scene).


   1:  class ButtonActor extends Actor
   2:      ClassGroup(MyGame) //group for actor classes menu (content browser)
   3:      placeable;
   4:   
   5:  ...
   6:   
   7:  //========================================================================
   8:  event Touch( Actor Other, PrimitiveComponent OtherComp, vector HitLocation, vector HitNormal )
   9:  {
  10:      //trigger event with myself as instigator
  11:      TriggerEventClass(class'SeqEvent_ButtonSet', self);
  12:  }
  13:   
  14:  ...
  15:   
  16:  defaultproperties
  17:  {  
  18:      SupportedEvents.Add(class'SeqEvent_ButtonSet') //to see it in kismet (selected actor, add event using actor...)
  19:  }

3. connect it to some kismet action

Here we need to insert an instance of our button into scene and (with button selected) in kismet right click Add event using actor -> you'll see our new event in submenu, add it! After that, all that is left is to connect it to whatever action you want. Example image shows button that plays open the door animation and turns matching color lights connected to door and button off.